How to Use MQTT for a Unified Smart Home
February 24, 2026
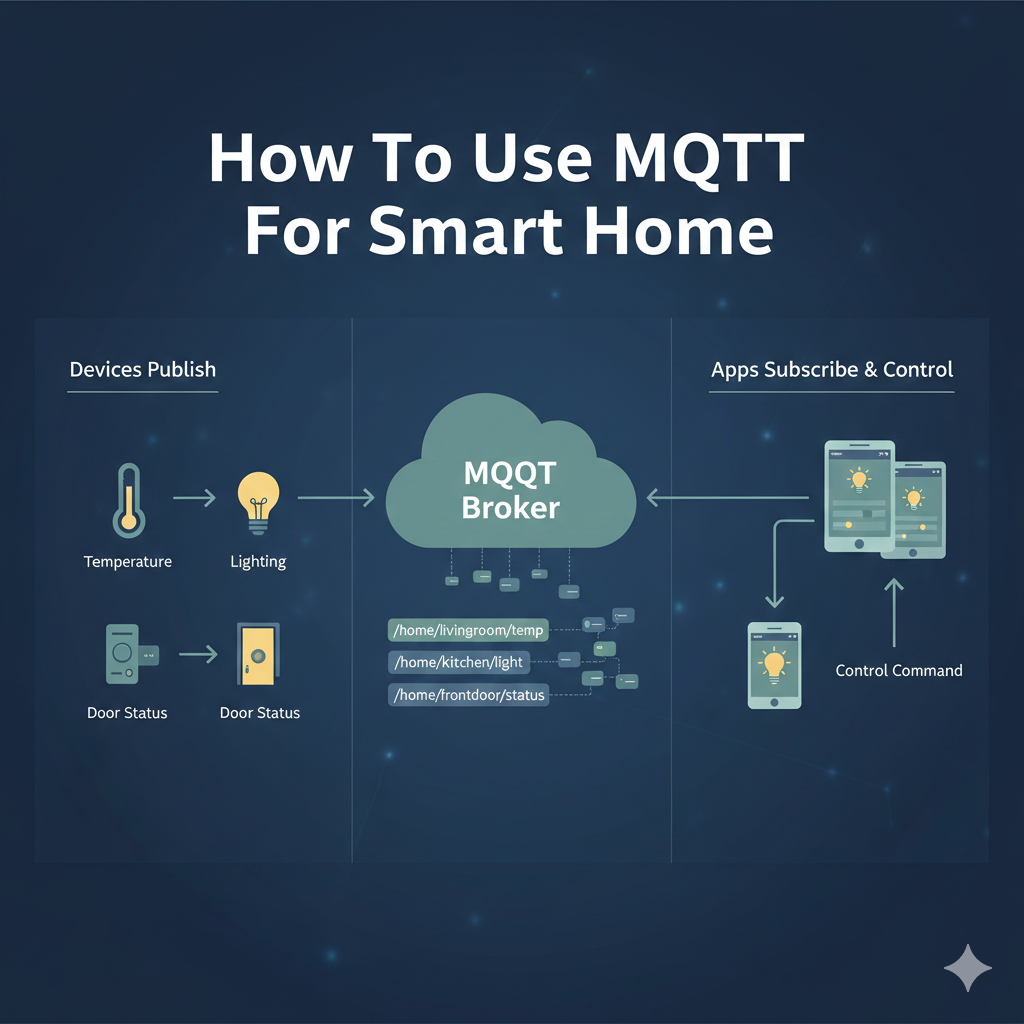
The Problem: A Fragmented Smart Home
The modern smart home is often a messy collection of devices from different brands, each with its own app and cloud service. This leads to cloud dependency, a lack of interoperability, and privacy concerns. The solution is to create a local, unified system using MQTT as the central nervous system.
MQTT as the Solution: A Central Hub
By introducing an MQTT broker into your home network, you create a central hub that all your devices can talk to. This is the foundation of a local, private, and powerful smart home.
In this model, your custom ESP32 sensor publishes its temperature reading. Home Assistant sees this and sends a command to a Tasmota smart plug. This all happens locally and instantly.
Integrating Commercial Devices into MQTT
Many commercial devices that don't natively support MQTT can be integrated using a central controller like Home Assistant.
| Device Type | Integration Method |
|---|---|
| Shelly/ESPHome | These devices have first-class MQTT support. You can configure them to talk directly to your broker. |
| Zigbee/Z-Wave | Use a USB stick with bridge software like Zigbee2MQTT. This software translates Zigbee signals into MQTT messages. |
| Philips Hue | Home Assistant's integration can expose all Hue lights as entities that can then be controlled by MQTT automations. |
By using the MQTT publish-subscribe model as the backbone, you can integrate devices from any brand, giving you ultimate control.
Designing Your Smart Home’s MQTT Topic Structure
A well-designed topic structure is the bedrock of a scalable and maintainable MQTT smart home. A logical hierarchy makes it easy to understand what’s happening, debug issues, and write automations. Avoid using random topics like temp or light1. Instead, create a consistent, hierarchical schema.
Common Strategy: The location/device_type/device_name/state Schema
This is a highly effective and widely adopted structure:
home/livingroom/lights/ceiling/state: Reports the ON/OFF state of the living room ceiling light.home/livingroom/lights/ceiling/set: Sends a command (e.g.,ON,OFF) to control the light.home/kitchen/sensor/temperature/state: Reports the temperature from a kitchen sensor.home/garage/door/state: ReportsOPENorCLOSED.home/garage/door/set: Sends a command likeTOGGLE.
Key Elements of This Structure:
- Base Level: A top-level namespace like
home,office, orworkshop. - Location: The physical room or area (e.g.,
livingroom,kitchen,outside). - Device Type: A broad category (e.g.,
lights,sensors,switches,climate). - Device Name: A specific identifier for the device (e.g.,
ceiling,desk-lamp,window-sensor). - Measurement/Action: The specific data point or action (e.g.,
state,set,temperature,humidity,color,brightness).
State vs. Command Topics
The separation of state and command (or set) topics is a crucial design pattern. Here's why:
- Eliminates Loops: Imagine a device subscribes and publishes to the same topic. If you send
ON, the device turns on and publishesONback to the topic. It then receives its own message and might try to turn on again, creating a command loop. - Authoritative State: Your home automation hub (like Home Assistant) knows the desired state (what it sent to
/set) and the actual state (what the device reported on/state). If you sendONbut the device reportsOFF, the hub knows the command failed. - Optimistic UI: When you tap a button in your dashboard, the UI can immediately look like it's on (optimistic update) while it sends the command to the
/settopic. If it receives a different/stateback, it can then correct itself.
The Core Components: Broker and Hub In-Depth
Your MQTT smart home has two central software components:
-
The MQTT Broker: The message dispatcher. Its only job is to receive messages from publishers and route them to subscribers. It’s the post office of your smart home.
- Mosquitto: This is the de-facto standard for self-hosted MQTT. It's open-source, lightweight, and incredibly reliable. It can run on anything from a Raspberry Pi to a powerful server. Configuration is done via a simple text file where you can set up users, passwords, and access control.
-
The Home Automation Hub: The brain. This software subscribes to the state topics, logs data, makes decisions, and publishes to the command topics. It’s where you build your dashboards and create automations.
- Home Assistant: The most popular open-source hub. It has a massive library of integrations for thousands of devices. It can run the Mosquitto broker as an add-on, making setup straightforward. Its automation engine is extremely powerful, and its frontend (Lovelace UI) is fully customizable.
- Node-RED: A visual programming tool that is often used alongside Home Assistant. You drag and drop nodes to create automation flows. An MQTT node can trigger a flow, which can then perform actions, filter data, and publish new MQTT messages. It's excellent for complex, multi-step automations.
- openHAB: Another mature open-source platform with a strong community and a focus on being technology-agnostic. It also has deep MQTT support.
For most users, the combination of Home Assistant OS on a Raspberry Pi 4/5 (or a similar single-board computer/Intel NUC) with the Mosquitto add-on provides the perfect balance of power, ease of use, and local control.
Bridging Worlds: A Deep Dive into Device Integration
Let’s expand on how to bring different types of devices into your MQTT ecosystem.
Natively Supported Devices (The Easy Way)
Many smart devices designed for tinkerers and power users have first-class MQTT support built-in. This is the ideal scenario.
- Tasmota & ESPHome: These are alternative firmwares you can flash onto Wi-Fi smart devices that use ESP8266 or ESP32 chips (like many Sonoff, Tuya, and Wyze products). Flashing a device frees it from its original cloud service, making it a purely local MQTT device.
- Tasmota: Provides a web interface on the device itself for configuration. After flashing, you connect to the device’s Wi-Fi hotspot, tell it your network credentials, and then navigate to its IP address. In the MQTT configuration page, you enter your broker's IP, port, and user credentials. It will automatically discover entities in Home Assistant.
- ESPHome: Uses YAML configuration files to define a device's behavior. This approach is more structured and integrates perfectly with Home Assistant. You define the sensors, switches, and their corresponding MQTT topics. ESPHome compiles the firmware for you, and you can even update it over the air.
Protocol Bridging (Zigbee & Z-Wave)
These are low-power mesh networking protocols, ideal for battery-operated sensors. They don’t use Wi-Fi and can't talk to an MQTT broker directly. You need a bridge.
- Zigbee2MQTT: This is a phenomenal piece of software that acts as a bridge. The hardware consists of a USB stick (a Zigbee Coordinator, like the SONOFF Zigbee 3.0 Dongle Plus). You plug this into your Home Assistant machine.
- The Zigbee2MQTT software talks to the coordinator stick.
- You “pair” your Zigbee devices (motion sensors, door sensors, light bulbs) with the coordinator.
- When a device changes state (e.g., motion is detected), it sends a Zigbee signal to the coordinator.
- Zigbee2MQTT receives this signal and translates it into a structured MQTT message, publishing it to a topic like
zigbee2mqtt/livingroom_motion_sensor. - To control a Zigbee light, Home Assistant publishes a JSON payload to
zigbee2mqtt/livingroom_light/set, and the bridge translates this back into a Zigbee command. This setup gives you the rock-solid reliability of Zigbee with the flexibility of MQTT, completely local and cloud-free.
Cloud Polling & Webhooks (The Compromise)
What about devices you can't flash or that don't have a local API (like some from Ring, Nest, or Wyze)?
- Integration via Polling: Home Assistant can often use an official or community-built integration to connect to the device’s cloud service using your account credentials. It will then periodically “poll” the cloud for the device’s state (e.g., ask every 30 seconds, “Is the front door locked?”). When it gets the state, it can represent that as an entity within Home Assistant, which can then be used in automations to trigger MQTT messages.
- Integration via Webhooks: A better approach, if available, is webhooks. Some cloud services (like IFTTT) allow you to trigger an action when a device state changes. You can have it send a webhook to your Home Assistant instance. This is faster than polling. Home Assistant can then convert this incoming webhook into an MQTT message.
While this re-introduces a cloud dependency, it unifies control. You can still use a single dashboard and automation engine to manage all your devices, even the locked-down ones.
Unleashing the Power: Advanced MQTT Automation Examples
This is where your MQTT-based smart home truly comes alive. Here are some practical examples using Home Assistant as the hub.
Automation 1: Smart Welcome and Goodbye
- Goal: When the first person arrives home, turn on the entryway lights and thermostat. When the last person leaves, turn everything off.
- Components:
- Home Assistant’s person tracking (using the mobile app).
- MQTT-controlled lights (Tasmota/Zigbee).
- MQTT-controlled thermostat (or a climate device integrated into HA).
- The Flow:
- Trigger: Home Assistant’s state for
zone.home(the number of people at home) changes from0to1. - Action: Home Assistant publishes an MQTT message:
- Topic:
home/entryway/lights/set, Payload:ON - Topic:
home/thermostat/mode/set, Payload:heat - Topic:
home/thermostat/temperature/set, Payload:21
- Topic:
- Trigger (Goodbye): State of
zone.homechanges to0. - Action: Home Assistant publishes:
- Topic:
home/all/lights/set, Payload:OFF(using a group or script) - Topic:
home/thermostat/mode/set, Payload:off
- Topic:
- Trigger: Home Assistant’s state for
Automation 2: Dynamic Lighting Based on Motion and Time
- Goal: In the hallway at night, turn on the lights to a dim 10% when motion is detected. During the day, turn them on to 100%. Turn them off 2 minutes after motion stops.
- Components:
- Zigbee motion sensor (reporting to
zigbee2mqtt/hallway_motion). - Zigbee dimmable light bulb (controlled via
zigbee2mqtt/hallway_light).
- Zigbee motion sensor (reporting to
- The Flow:
- Trigger: MQTT message received on topic
zigbee2mqtt/hallway_motionwith payload{"occupancy": true}. - Condition: Check the time of day.
- Action (Night): Publish to
zigbee2mqtt/hallway_light/setwith payload{"state": "ON", "brightness": 25}. - Action (Day): Publish to
zigbee2mqtt/hallway_light/setwith payload{"state": "ON", "brightness": 255}. - Separate Automation (Turn Off):
- Trigger: State of the motion sensor in Home Assistant has been
offfor 2 minutes. - Action: Publish to
zigbee2mqtt/hallway_light/setwith payload{"state": "OFF"}.
- Trigger: State of the motion sensor in Home Assistant has been
- Trigger: MQTT message received on topic
Automation 3: Washing Machine Notifications
- Goal: Get a notification on your phone when the washing machine has finished.
- Components:
- A Tasmota smart plug with power monitoring.
- The Flow:
- The smart plug constantly publishes its power data (in watts) to an MQTT topic like
tasmota/washing_machine/sensor. - Automation 1 (Washing Started):
- Trigger: Numeric state of the power sensor crosses above 50 watts.
- Action: Turn on an “input boolean” helper in Home Assistant called
Washing Machine Running.
- Automation 2 (Washing Finished):
- Trigger: Numeric state of the power sensor drops below 5 watts.
- Condition: The
Washing Machine Runningboolean ison. - Action:
- Send a notification to your phone: “The washing machine has finished!”
- Turn off the
Washing Machine Runningboolean.
- The smart plug constantly publishes its power data (in watts) to an MQTT topic like
Securing Your MQTT Smart Home Network
An unsecured MQTT broker is a huge security hole. If it’s open to your network, anyone who connects to your Wi-Fi could control your home. Here’s how to lock it down using Mosquitto.
-
Enforce Authentication:
- In your
mosquitto.conffile, add:allow_anonymous false password_file /path/to/your/passwordfile - Use the
mosquitto_passwdutility to create a file with usernames and hashed passwords. - Now, no client can connect without a valid username and password.
- In your
-
Use Access Control Lists (ACLs):
- You don’t want your temperature sensor to be able to control your front door lock. ACLs let you define which users can read from or write to specific topics.
- Create an
acl.conffile and point to it inmosquitto.conf. - Example ACL entries:
# The homeassistant user can do anything
user homeassistant
topic readwrite #

# The sensor user can only write to sensor topics
user sensor_user
topic write home/+/sensors/#

# The light_user can control lights but not read sensor data
user light_user
topic readwrite home/+/lights/#
By creating different users for different devices or device types, you create a highly secure system where a compromised device has a very limited ability to cause problems.
Visualizing and Controlling Your Unified Home
Once your devices are all speaking MQTT and integrated into Home Assistant, the final step is creating a user-friendly interface.
- Home Assistant Dashboards (Lovelace): You can create multiple dashboards for different rooms, people, or purposes.
- Cards: The UI is built from “cards.”
- Entities Card: A simple list of switches and their states.
- Light Card: A card with a toggle, brightness slider, and color wheel for a smart bulb.
- Gauge Card: A visual gauge for temperature, humidity, or power usage.
- History Graph Card: A graph showing the history of a sensor’s value over time.
- Button Card: A highly customizable button that can be programmed to do anything, from publishing a specific MQTT message to running a complex script.
By combining these elements, you can build a beautiful and functional control panel for your entire home, accessible from your phone, tablet, or a wall-mounted display—all served locally from your central hub.